Quick Summary: Neglected solar panels lose 15–25% of their rated output within 3–5 years. This guide delivers the complete solar panel maintenance framework — from daily monitoring to annual professional inspections — so every watt your system generates is a watt you actually use.
Why Solar Panel Maintenance Directly Determines Your ROI
A 400W solar panel operating at 80% efficiency due to dust and soiling is functionally a 320W panel. You paid for 400W. That invisible 20% gap compounds over a 25-year system lifetime into tens of thousands of dollars in unrealized energy savings.
Solar panel maintenance isn’t optional housekeeping — it’s performance engineering. Every layer of particulate matter, every micro-crack ignored, every loose connector left unaddressed degrades your system’s performance ratio (PR), a metric that measures actual output against theoretical maximum.
The industry benchmark: A well-maintained residential system maintains a PR of 75–85%. Poorly maintained systems routinely fall to 60–65%, invalidating manufacturer efficiency claims entirely.
Understanding Solar Panel Degradation: The Enemy You’re Fighting
Different solar panel technologies degrade at different rates; to understand which one is best for your environment, check out our [Topcon-vs-Hjt Solar Panels Guide 2026].
1. Light-Induced Degradation (LID)
Occurs in the first 1,000 hours of sun exposure. Boron-oxygen defects in crystalline silicon cause an initial 1–3% efficiency drop. This is unavoidable and factory-anticipated — but it underscores why baseline performance measurements taken at installation (not at purchase) are the true benchmark.
2. Potential-Induced Degradation (PID)
High voltage differentials between the panel frame and cells, combined with humidity, cause sodium ion migration across the glass surface. PID can destroy 30–50% of a module’s output within 2 years if not addressed. Systems in humid coastal climates are at the highest risk.
Mitigation: Use PID-resistant modules (look for IEC 62804-certified panels), install anti-PID devices on inverters, and ensure proper earthing of your array frame.
3. Soiling and Shading Losses
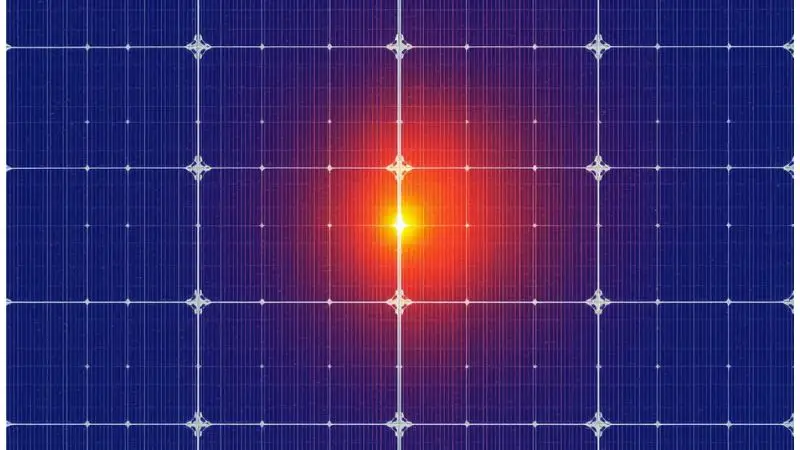
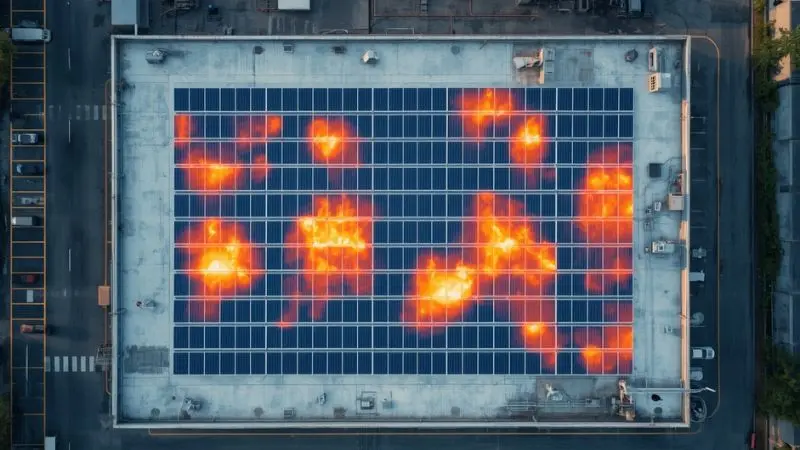
Bird droppings, dust, pollen, and industrial particulates are the leading causes of day-to-day output loss. A single bird dropping covering 10cm² on a 60-cell panel can cause a localized hotspot exceeding 150°C, permanently damaging cell junctions through thermal cycling.
The “one bad cell” problem is amplified by series-wiring: in a standard string inverter setup, the weakest panel limits the entire string’s output.
4. Mechanical and Environmental Stress
Thermal expansion and contraction cycles (panels cycle between -10°C and +85°C in many climates) fatigue solder bonds and junction boxes. Hail, wind, and snow loads induce micro-cracks invisible to the naked eye but detectable via electroluminescence (EL) imaging.
Solar Panel Maintenance Schedule: The Definitive Framework
Effective solar panel maintenance operates across three time horizons. Collapse these into a calendar entry, not an aspiration.
Monthly: Data Monitoring (Zero Physical Access Required)
“Your inverter’s monitoring portal is your first line of defense. If you notice unexpected dips in power, start with our [7 Easy Steps to Master Your Home Energy Audit Report and Save Big] to identify the cause.”
What to check monthly:
- Specific yield (kWh/kWp): Compare actual vs. expected output using local irradiance data from NASA POWER or Solargis databases. A >5% unexplained deviation warrants investigation.
- Performance ratio trends: A steadily declining PR curve over 3 months signals soiling, shading from new obstructions, or equipment degradation.
- Inverter fault codes: Log every error code. Intermittent faults that self-clear are early warnings of string insulation failure or connection corrosion.
- String current balance: On systems with string-level monitoring, each string should produce within 2–3% of others under identical irradiance. Imbalance indicates a shaded or failing module.
Tool recommendation: Platforms like SolarEdge monitoring, Enphase Enlighten, or third-party aggregators like Solar-Log provide this data with automatic anomaly alerting.
Quarterly: Visual Inspection
This is a structured walk-around, not a casual glance. Take photos each quarter from identical angles to enable side-by-side degradation comparison.
Roof-level inspection checklist:
- Panel glass: check for cracks, chips, delamination (bubbling between layers), or discoloration (browning of EVA encapsulant indicates UV aging)
- Frame integrity: look for corrosion, bent rails, or loose mounting clamps
- Junction boxes: confirm sealed, no moisture ingress, no burn marks around terminals
- Conduit and wiring: check for UV-degraded cable insulation, rodent damage, or chafing against roofing material
- Vegetation: trees and shrubs grow; reassess shading angles seasonally
Ground-level inspection checklist:
- Inverter status LEDs and display
- Combiner box: check fuses, DC disconnect condition
- AC disconnect and main panel connections
- Grounding conductor continuity (visual only — no measurement without a licensed electrician)
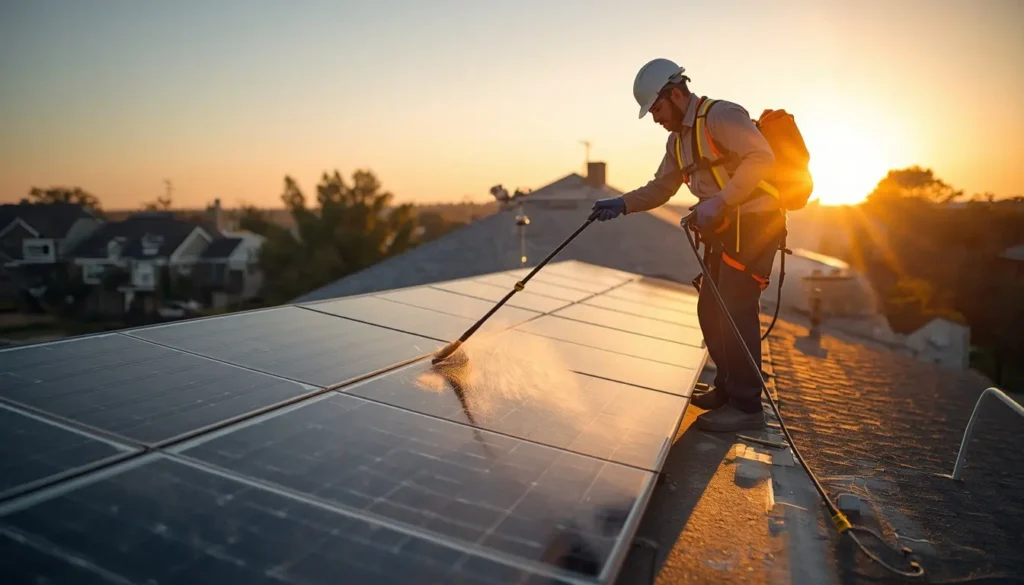
Bi-Annual: Physical Cleaning
Cleaning frequency depends on your location’s soiling rate. A panel in the Sahara-dust-laden air of North Africa or high-traffic industrial zones needs quarterly cleaning. A panel in rural Norway may need annual cleaning. The 2% yield loss threshold is the standard trigger: if soiling loss exceeds 2%, clean.
Professional vs. DIY Cleaning — the honest breakdown:
| Factor | DIY Cleaning | Professional Service |
|---|---|---|
| Cost | $0–$50 (materials) | $150–$400 per visit |
| Safety | High risk on pitched roofs | Trained, insured, equipped |
| Water quality | Tap water leaves mineral deposits | Deionized water, no residue |
| Tool access | Consumer brushes, standard hose | Reach poles, low-pressure systems |
| Detergent risk | High (voids warranty if wrong products used) | Approved cleaning agents |
| Thoroughness | Surface-level | Frame edges, junction box seals |
| Warranty protection | Potential risk | Documented, warranty-safe |
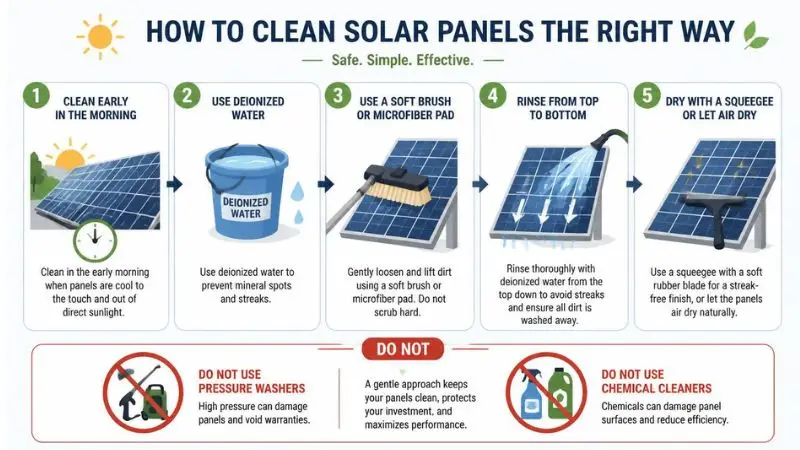
DIY Cleaning Protocol (if roof is safely accessible):
- Clean in early morning or evening — never on hot panels (thermal shock risks micro-crack formation)
- Use deionized or distilled water; never tap water in hard-water regions
- Soft-bristle brush or microfiber squeegee only — no abrasives, no pressure washers
- Rinse from top to bottom to carry debris away from frames
- Never use soap, detergent, or alcohol-based cleaners unless explicitly approved by your panel manufacturer
- Document cleaning date and pre/post irradiance-normalized output
Annual: Professional Technical Inspection
This is non-negotiable for any system operating under a manufacturer’s warranty or utility net metering agreement. A professional annual inspection should include:
Electrical testing:
- IV curve tracing — plots a panel’s current vs. voltage under standard test conditions; deviations identify shading losses, cell degradation, or bypass diode failures
- Insulation resistance testing (Megger test) — measures resistance between circuit conductors and ground; values below 1MΩ per IEC 62446 indicate dangerous insulation breakdown
- Thermal imaging — identifies hotspots, bypass diode failures, delamination, and connection resistance issues invisible to the naked eye
- String open-circuit voltage and short-circuit current measurement vs. nameplate specifications
Mechanical inspection:
- Torque verification of all mounting hardware (specified in Nm per racking manufacturer)
- Roof penetration sealant condition
- Ballasted system weight distribution (for flat commercial roofs)
Documentation deliverable: Always request a written inspection report with measurement data, photos, and any corrective action recommendations. This documentation is critical for warranty claims and for providing energy production guarantees to home buyers if you sell the property.
Solar Panel Maintenance: Technical Specifications Comparison
Understanding the maintenance implications of different panel technologies prevents costly mismatches between panel type and environment.
| Specification | Monocrystalline PERC | Polycrystalline | Thin-Film (CdTe) | TOPCon/HJT |
|---|---|---|---|---|
| Efficiency (STC) | 20–23% | 15–18% | 11–14% | 22–25% |
| Temperature Coefficient | -0.35% to -0.40%/°C | -0.40% to -0.45%/°C | -0.25% to -0.30%/°C | -0.24% to -0.30%/°C |
| LID Susceptibility | Moderate | High | Minimal | Very Low (HJT) |
| PID Susceptibility | Moderate (without treatment) | High | Low | Low |
| Soiling Sensitivity | Moderate | Moderate | Lower (larger cell area) | Moderate |
| Degradation Rate (annual) | 0.45–0.55%/yr | 0.55–0.65%/yr | 0.50–0.60%/yr | 0.30–0.40%/yr |
| Warranty (typical) | 25 yr product / 30 yr linear | 25 yr product / 25 yr linear | 10 yr product / 25 yr linear | 25–30 yr product |
| Micro-crack Risk | Moderate | Moderate | Low | Low-Moderate |
| Cleaning Sensitivity | Low | Low | High (no abrasives) | Low |
Key insight from the table: TOPCon and HJT panels carry the lowest annual degradation rates (0.30–0.40%/yr vs. 0.55%/yr for polycrystalline), meaning a 400W HJT panel retains ~88W more capacity over 25 years than an equivalent polycrystalline panel — before factoring in any maintenance-related losses.
Inverter Maintenance: The Overlooked Component
Effective inverter care is vital for efficiency. For more tips, read our guide on [Stop Wasting Money: The Ultimate Guide to Inverter Energy Savings 2026].
String Inverters (10–12 year lifespan):
- Replace electrolytic capacitors every 7–10 years (a $200–$600 component replacement vs. $1,500–$3,000 full inverter replacement)
- Clean internal cooling fans annually (a clogged fan causes thermal shutdown and accelerates component aging)
- Keep ambient temperature below 45°C; inverters mounted in direct sun lose efficiency and lifespan
Microinverters and Power Optimizers (20–25 year rated lifespan):
- Check for firmware updates quarterly — manufacturers regularly release efficiency and grid compliance updates
- Monitor per-panel production data monthly; a flat-lined microinverter output signals unit failure
- No field-serviceable parts; plan for unit replacement under warranty when failures occur
Battery storage systems (if applicable):
- Maintain a state of charge between 20–80% for lithium iron phosphate (LFP) longevity
- Monitor cell voltage balance monthly via the BMS app
- Annual thermal inspection of the battery enclosure
Advanced Solar Panel Maintenance Techniques for Maximum Yield
Beyond the standard schedule, elite maintenance practice incorporates these techniques:
Anti-Soiling Coatings
Hydrophobic nano-coatings (SiO₂ or TiO₂-based) applied to panel glass reduce particle adhesion by 60–80%. Leading products like Optimum Nano Shield or Diamon-Fusion extend effective cleaning intervals by 2–3× and pay back their application cost in 18–24 months in high-soiling environments.
Application frequency: every 3–5 years, or as directed by the coating manufacturer.
Electroluminescence Imaging
EL imaging applies a forward-bias current to panels in darkness, causing cells to emit near-infrared light. A specialized camera captures the emission pattern; cracks, inactive areas, and cell-level defects appear as dark regions invisible under normal light.
Cost: $50–$150 per panel for a professional EL inspection service. Worth commissioning at system installation (as a baseline), at year 5, and at year 10.
Drone-Based Aerial Inspection
Commercial and large residential arrays now routinely use UAVs equipped with dual RGB and thermal cameras. A drone survey covers 100kW of installed capacity in under 2 hours, providing actionable thermal and visual data at a fraction of the labor cost of manual inspection.
Cost benchmark: $0.02–$0.08/W for drone thermal + visual inspection (one-time survey).
Vegetation and Shading Audit
Use a Solar Pathfinder or Solmetric SunEye device annually to map shading from growing trees, new construction, or satellite dishes. Even a 5% shading increase on a critical string section can reduce whole-system output by 15–20% in non-optimized string configurations.
Common Solar Panel Maintenance Mistakes That Cost Thousands
1. Using tap water in hard-water regions. Mineral deposits from hard water leave a calcium film that, once dried, is harder to remove than the original soiling and reduces transmissivity by 2–4%. Always use deionized water.
2. Cleaning during peak sun hours. Heat differential between cold water and panel surface (up to 70°C in summer) causes thermal micro-fractures. Clean before 9 AM or after 4 PM, or when panels have been shaded.
3. Ignoring monitoring alerts. The SCADA monitoring systems in modern inverters generate actionable data. Homeowners routinely dismiss email alerts as technical noise — each alert ignored is potentially days of degraded output.
4. Assuming self-cleaning glass works indefinitely. Lotus-effect self-cleaning glass coatings work in rain-sufficient climates but fail in arid or high-particulate environments. Regular manual inspection is still required.
5. Skipping warranty documentation. Failure to document inspections and cleaning in a maintenance log provides manufacturers with grounds to void performance warranties during degradation claims.
6. DIY electrical work. High-voltage DC systems are lethal. A licensed solar technician must perform any electrical testing, connector work, or inverter servicing. This isn’t a legal formality — it’s physics.
Solar Panel Maintenance Cost-Benefit Analysis
Typical annual maintenance budget for a 10kW residential system:
| Service | Frequency | Annual Cost |
|---|---|---|
| Professional cleaning (2×/year) | Bi-annual | $300–$600 |
| Monitoring software subscription | Annual | $0–$150 |
| Annual professional inspection | Annual | $200–$400 |
| Anti-soiling coating (amortized) | Every 4 years | $50–$100 |
| Total annual maintenance | $550–$1,250 |
Return on maintenance investment:
- A 10kW system in a 5 peak-sun-hour location produces ~18,250 kWh/year
- Maintaining 83% PR vs. 70% PR (neglected system) = 13% additional yield = ~2,373 kWh/year
- At $0.12/kWh, the average rate = $285/year in additional revenue
- At $0.28/kWh (high-cost markets like California or Germany) = $665/year additional
- Extending system lifespan by 5 years through maintenance adds $5,000–$12,000 in total lifetime value
The math is unambiguous: proper solar panel maintenance costs less than it earns.
Building Your Solar Panel Maintenance Log
Documentation separates amateur solar ownership from professional asset management. Your maintenance log should capture:
- Installation date and baseline performance metrics (IV curve data, irradiance-normalized yield)
- Every inspection date, technician name, and findings
- All cleaning dates, method, water type, pre/post yield comparison
- Inverter error codes with dates and resolution
- Any part replacements with component specs and installer credentials
- Warranty claim dates and outcomes
Store this log digitally with cloud backup. For homeowners planning to sell, a documented maintenance history demonstrably increases the valuation of solar-equipped homes by providing buyers with certified system performance data.
Conclusion: Solar Panel Maintenance Is a Discipline, Not an Event
A solar investment without a maintenance strategy is a depreciating asset masquerading as a growing one. Solar panel maintenance — executed monthly through data monitoring, quarterly through visual inspection, biannually through professional cleaning, and annually through comprehensive technical assessment — is what converts a 25-year warranty into 25 years of maximum-yield performance.
The technology in your panels is extraordinary. Monocrystalline PERC, TOPCon, and HJT cells are engineering marvels capable of converting sunlight to electricity for three decades with minimal physical intervention. But “minimal” is not “zero.” The difference between a solar system that delivers and one that disappoints is almost always found in the maintenance log — or the absence of one.
Implement the framework in this guide. Set the calendar reminders. Hire the professional. And let your solar investment do what it was designed to do: generate clean, low-cost power every single day for the next 25+ years.
Quick Reference: Solar Panel Maintenance Checklist
Monthly (Digital)
- Review the inverter monitoring dashboard
- Compare actual vs. expected specific yield
- Check for and log any fault codes
- Verify the string’s current balance
Quarterly (Visual)
- Roof walk-around with photographic record
- Inspect panel glass, frames, and junction boxes
- Check cabling and conduit condition
- Reassess shading obstructions
Bi-Annual (Physical)
- Professional or DIY panel cleaning with deionized water
- Document pre/post cleaning yield comparison
- Inspect and re-seal any junction box gaskets as needed
Annual (Technical)
- IV curve tracing by a certified technician
- Infrared thermal imaging
- Insulation resistance (Megger) testing
- Mechanical torque verification
- Full inspection report with measurement data
“Read More / Related Articles:”
- Best Energy-Efficient Air Conditioners of 2026: Tested and Ranked
- Beat the Summer Heat: How to Keep Your House Cool Without Skyrocketing Electricity Bills 2026
- Boost Your RV Power: Essential LiFePO4 Battery Upgrade Kits for Off-Grid Living
- Don’t Panic! Power Station Not Charging? 5 Fast Fixes That Actually Work
- Anker Solix F3800 vs EcoFlow Delta Pro Ultra: Don’t Buy Until You See This Heavy-Duty Battle!
- EcoFlow Delta Pro Ultra vs Bluetti: Don’t Buy Until You See This Heavy-Duty Battle!
- How to Slash Your Electricity Bills Using Smart Tech and the Best Eco-Appliances